VORMAX Toilet Not Flushing Properly: Causes, Solutions, and Maintenance
If you’re dealing with a VORMAX toilet that’s not flushing properly, you’re not alone. This guide will walk you through common issues, troubleshooting steps, and maintenance tips to get your toilet back in working order.
Most VORMAX flushing problems stem from mineral buildup, clogged jets, or improper water levels. Regular cleaning and minor adjustments can often resolve these issues.
Let’s now go ahead and learn what causes your VorMax toilet flushing issue.
Common Reasons for VORMAX Toilet Flushing Issues
Several factors can contribute to poor flushing performance in VORMAX toilets:
1. Mineral Buildup
Hard water, containing high levels of calcium and magnesium, can lead to mineral deposits in your toilet. These deposits often accumulate in crucial areas like the jet flush nozzle and flapper valve seal.
2. Clogged Jet Flush Nozzle
The jet flush nozzle is a critical component of the VORMAX system. When clogged, it can significantly reduce flushing power. Debris or mineral buildup are common culprits.
3. Insufficient Water in the Tank
VORMAX toilets require a specific water level to function optimally. If the water level is too low, it can result in weak or incomplete flushes.
4. Malfunctioning Flush Valve
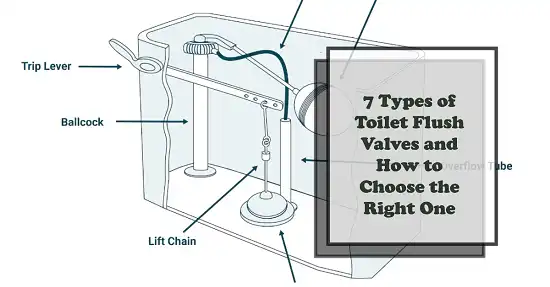
The flush valve controls the release of water from the tank into the bowl. Issues with this component can lead to various flushing problems.
5. Problems with the Flush Lever or Chain
A loose or disconnected chain can prevent the flush valve from opening properly, resulting in incomplete flushes.
Diagnosing VORMAX Toilet Flushing Problems
Before attempting any repairs, it’s crucial to identify the specific issue you’re facing. Here are some common symptoms and their potential causes:
| Symptom | Possible Causes |
| Weak flush | Low water level, mineral buildup, clogged jet nozzle |
| Incomplete flush | Faulty flush. valve, improper chain length |
| Double flushing | Flapper not sealing properly |
| No flush | Disconnected chain, broken flush lever |
| Slow refill | Faulty fill valve, partially closed water supply valve |
Troubleshooting Your VORMAX Toilet Flush Issue
Once you’ve identified the likely cause of your flushing issues, it’s time to roll up your sleeves and get to work. Let’s explore some common troubleshooting steps.
Adjust Water Level
Checking and adjusting the water level in your VORMAX toilet is a good place to start. Remove the tank lid and locate the fill valve and float. Flush the toilet and watch as it refills. The water should stop about an inch below the top of the overflow tube. If it’s too low or too high, you’ll need to adjust the float according to your specific model’s instructions.
Get Rid of Mineral Buildup
Dealing with mineral buildup requires a bit more effort but can often resolve flushing issues. For light buildup, a simple solution of equal parts white vinegar and water can work wonders. Spray this mixture on the affected areas, let it sit for about half an hour, then scrub with a non-abrasive brush before flushing. For heavier buildup, you might need to use a commercial lime and rust remover, following the product instructions carefully. In extreme cases, a pumice stone can be used to gently scrub away stubborn deposits, but be cautious to avoid damaging the porcelain.
Clean Flush Nozzle
Cleaning the jet flush nozzle is another crucial maintenance task. Locate the nozzle under the rim of the toilet bowl. Use a small brush or even a toothpick to clear any visible debris. For stubborn clogs, you might need to carefully use a wire hanger to clear the opening.
Replace Flush Valve
If you suspect issues with the flush valve, you’ll need to turn off the water supply and flush the toilet to empty the tank. Disconnect the chain from the flush lever and unscrew the flush valve from the bottom of the tank. Replace it with a new flush valve, taking care to ensure it’s properly seated and sealed.
Check the Flapper Chain
The chain connecting the flush lever to the flapper is a small but critical component. It should have a slight slack when the flush lever is at rest, with no more than half an inch of play. You can adjust the chain length using the clips provided or by relocating the connection point on the flush lever.
Maintenance Tips to Prevent Future Flushing Issues
Regular maintenance can prevent many common VORMAX flushing problems:
- Clean your toilet weekly using non-abrasive cleaners.
- Perform a deep clean, including the jet nozzles, monthly.
- Consider using a water softener if you live in an area with hard water.
- Avoid flushing non-biodegradable items that can clog the system.
The Bottom Line
VORMAX toilets represent a significant advancement in bathroom technology, offering superior flushing power and efficiency. By understanding common issues and performing regular maintenance, you can ensure your VORMAX toilet continues to function at its best for years to come. Remember, a well-maintained toilet not only performs better but also contributes to water conservation efforts. With the knowledge gained from this guide, you’re well-equipped to tackle most VORMAX flushing issues. However, when in doubt, don’t hesitate to consult with a licensed plumber to avoid potentially costly mistakes and keep your bathroom in perfect working order.

